Anomaly Detection
The Analyze feature enables you to create Anomaly Models that learn from your monitored variables.
These models help detect unusual patterns or abnormal behaviors in your system.
How-to add an Anomaly Detection model
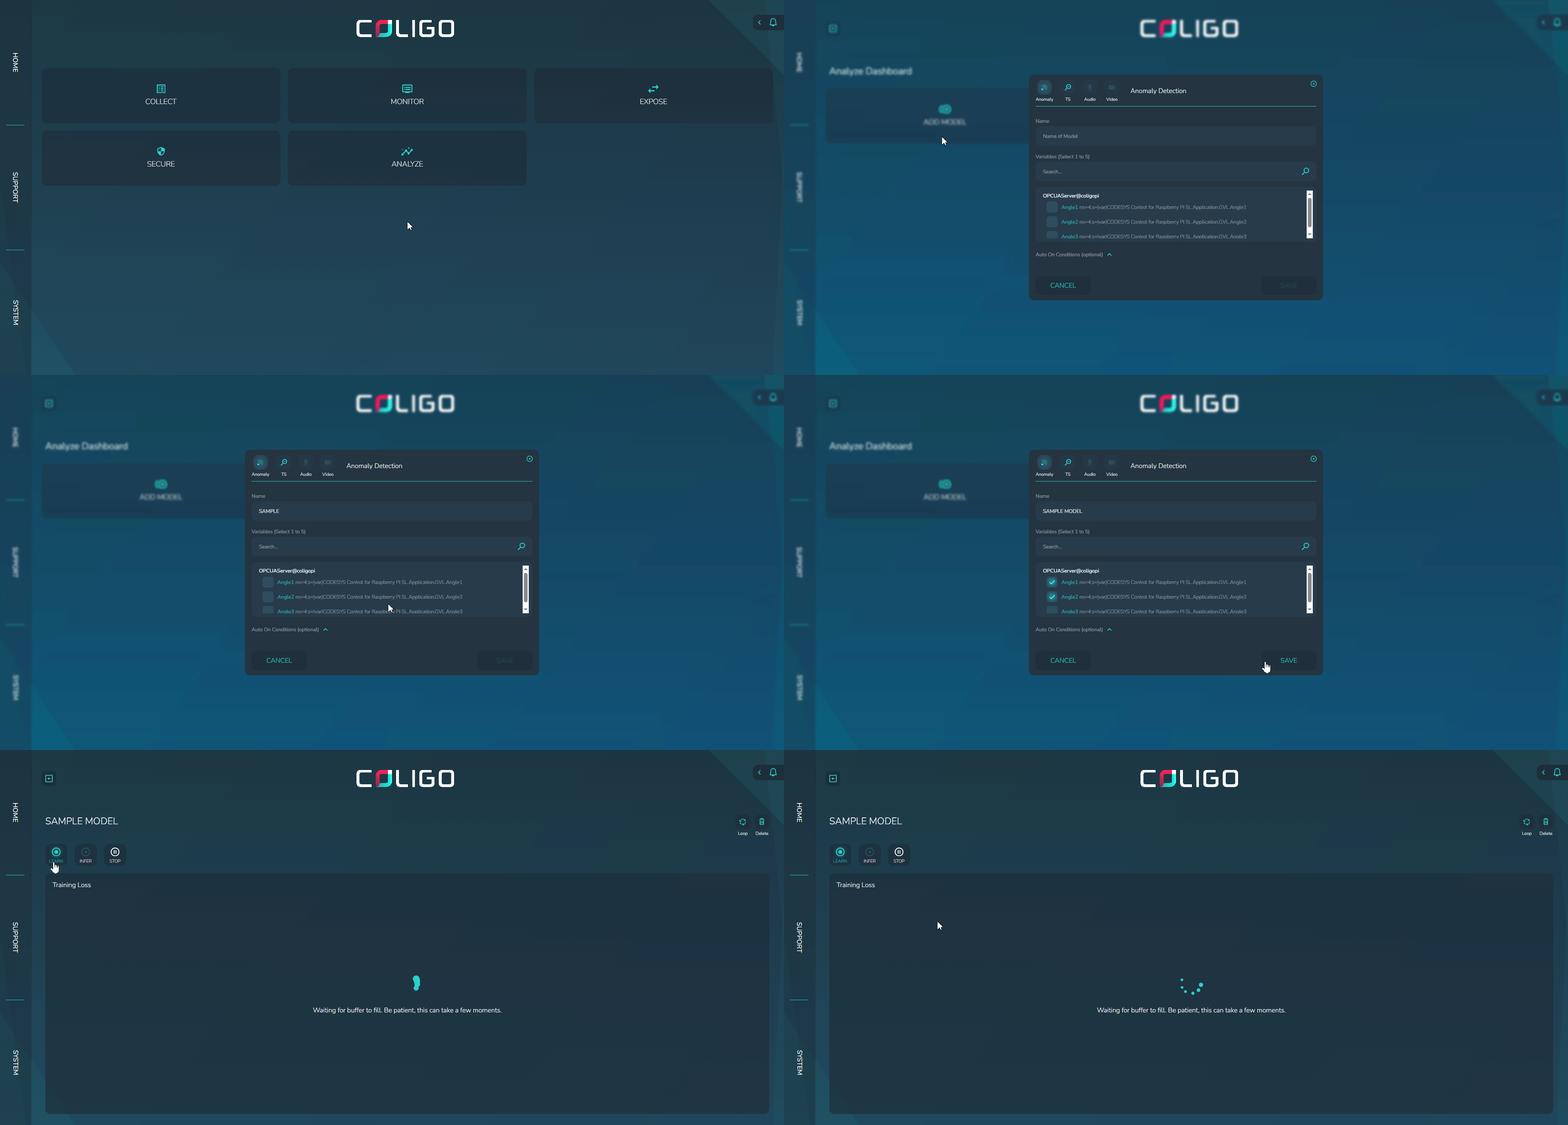
1. Access the Analyze Page
- In the SYNA web interface, click ANALYZE.
- Select ADD MODEL.
2. Create a new Anomaly Model
- Enter a Name for your model (e.g.,
MotorSpeed_Anomaly). - Choose the variables you want to include in the analysis.
- Only variables collected in the Connect step are available.
- Click SAVE to create the model.
2.1 Auto On Conditions
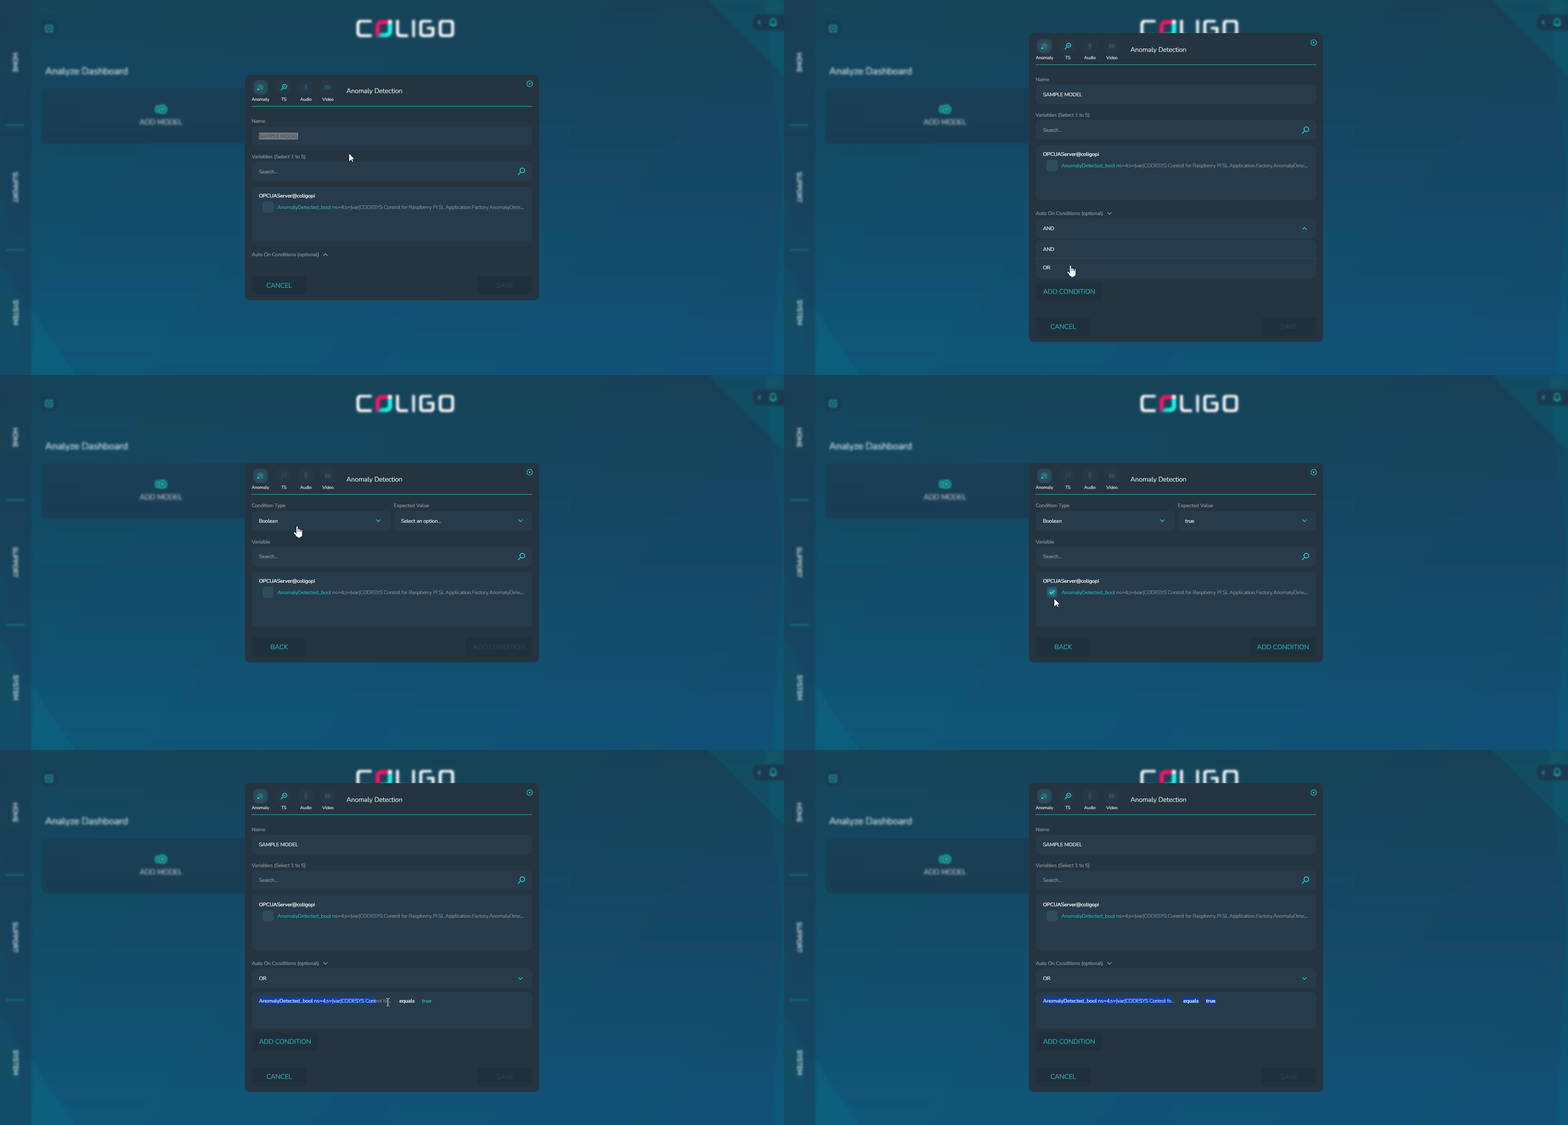
The Auto On Conditions feature in the COLIGO Anomaly Model lets you define when anomaly detection should automatically start or stop based on variable values from your OPC UA server.
Instead of running continuously, the model checks one or more variables to decide whether to enable or pause anomaly detection.
This helps prevent false alarms during maintenance, service routines, or controlled process states.
Supported Control Variables
COLIGO can use the following variable types to control activation:
-
Boolean Variable
- You can define whether detection starts when the variable is
trueor when it isfalse. - Example:
- Start detection when
MachineRunning = true - Start detection when
MaintenanceMode = false
- Start detection when
- You can define whether detection starts when the variable is
-
String Variable
- You can define which string value enables detection.
- Any string can be used as the activation value (e.g.,
"RUN","ACTIVE","ON"). - Example:
- Start detection when
Mode = "RUN"
- Start detection when
Logical Conditions (AND / OR)
You can also combine two conditions using AND or OR logic to create more advanced activation rules.
Both Boolean and String variables can be used together.
Examples:
- AND → Start only if both conditions are met
MachineRunning = true AND Mode = "RUN"
- OR → Start if either condition is met
MaintenanceMode = false OR Override = true
This flexibility allows you to design more robust activation logic tailored to your production scenarios.
Example Use Case
Imagine a production line with scheduled maintenance:
- During maintenance, the PLC sets the Boolean control variable to
false. - Coligo pauses anomaly detection and does not generate alerts.
- Once maintenance is complete, the PLC sets the variable back to
true. - Coligo resumes anomaly detection seamlessly.
Use descriptive names for models (e.g., Temperature_Stability or Acceleration_Check) so they are easier to manage later.
3. Training the Model
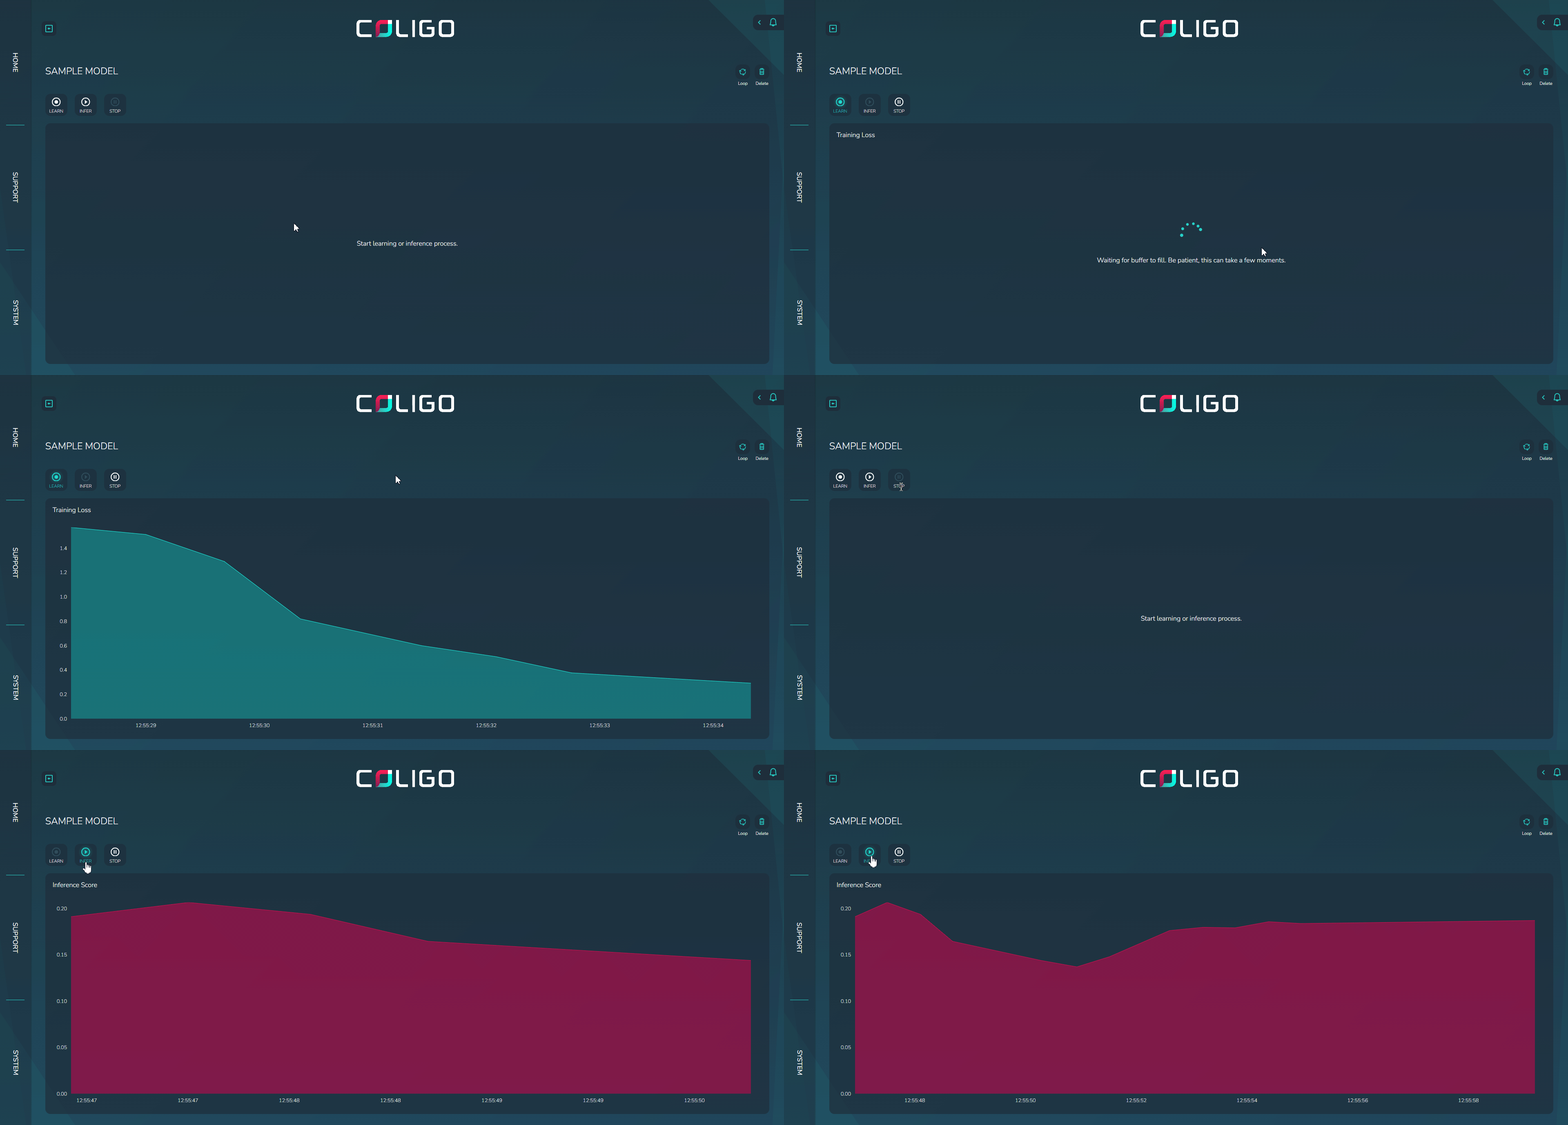
- Start the training process from the model dashboard.
- The model will analyze the selected variable data and build its baseline behavior.
- Once training is complete, the model is ready for anomaly detection.
Training duration depends on the data size and the number of variables selected.
4. Using the Anomaly Model
✅ Once trained, the model will:
- Continuously monitor incoming variable data.
- Highlight unusual patterns or abnormal states in the Notifications Tab.
- Provide alerts and logs for detected anomalies.
Below are the customizations that can be done with your anomaly model:
4.1 Loop back
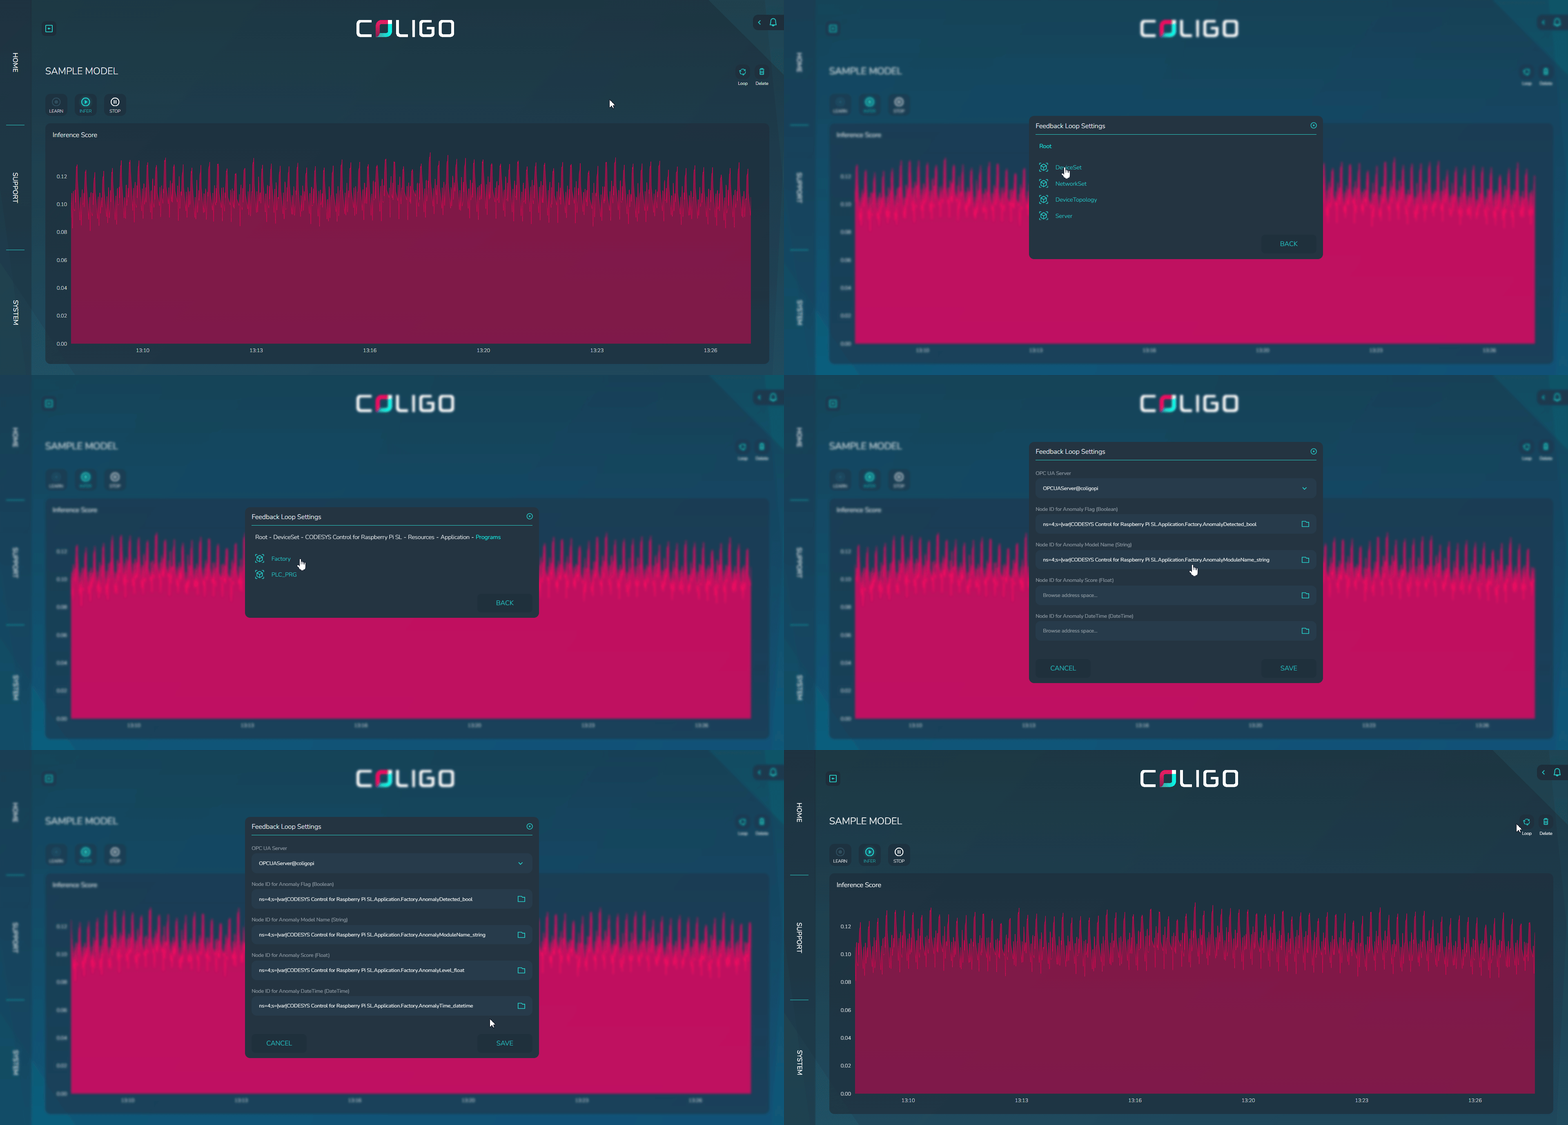
The Loopback Feature in COLIGO’s Anomaly Detection Model enables a complete AI feedback loop with your PLC.
Once the anomaly model starts, it continuously monitors the OPC UA variables from the PLC.
When an anomaly is detected, COLIGO provides a facility to send data back to the PLC.
This loopback data can be written to the same server or to another connected server.
The server must be connected via the Connect Feature, and you must browse and select the exact Node ID where the data should be updated.
Supported Data Types:
The loopback feature supports writing to the following variable types:
- Boolean Variable – Indicates whether an anomaly was detected (
true/false). - String Variable – Contains the name of the anomaly model that triggered.
- Float Variable – Represents the anomaly score.
- DateTime Variable – Provides the exact timestamp of when the anomaly occurred.
4.2 Retrain the model
The Retraining feature allows you to re-learn your anomaly model whenever needed.
This is useful when:
- You are not satisfied with the current inference results.
- You want a longer learning sample period.
- Your process has changed and requires the model to adapt to the new behavior.
How to Retrain the Model
-
Open the Model
- Navigate to the anomaly model you want to retrain.
-
Stop Inference Mode
- Click Stop button.
- Once inference is stopped, the Learn button becomes active again.
-
Start Learning
- Press the Learn button to retrain the model.
- You can extend the learning duration to capture a longer sample period if desired.
-
Switch Back to Inference
- After learning, you can manually start inference mode again.
- Alternatively, you can wait for the model to auto-switch to inference once learning is complete.
-
Monitor Notifications
- All retraining progress and state changes are visible in the Notifications tab.
4.4 Deleting the model
The Deleting a Model feature allows you to permanently remove an anomaly model from Coligo when it is no longer required.
This helps you keep your workspace clean and organized by removing outdated or unused models.
How to Delete a Model
-
Go to the Analyze Tab
- Open the Analyze section in the Coligo interface.
-
Select the Model
- From the list of available models, choose the one you want to delete.
-
Click the Delete Icon
- In the top-right corner, locate the Delete button (trash icon).
- Click on it to initiate deletion.
-
Confirm Deletion
- A confirmation dialog will appear.
- Confirm the action to proceed.
- Once confirmed, the model is permanently deleted.
- Deletion is irreversible. Once a model is deleted, it cannot be recovered.
- Ensure that the model is no longer needed before confirming deletion.
- If you only wish to stop using a model temporarily, consider stopping inference instead of deleting.
5. Troubleshooting
-
Model not training?
- Ensure sufficient historical data is available in the Monitor.
-
No anomalies detected?
- Retrain the model for a longer period and wait for it to transition to inference mode automatically.
-
Too many false alerts?
- Retrain the model using a larger dataset.